
Other Arduino Codes and Videos by Robojax
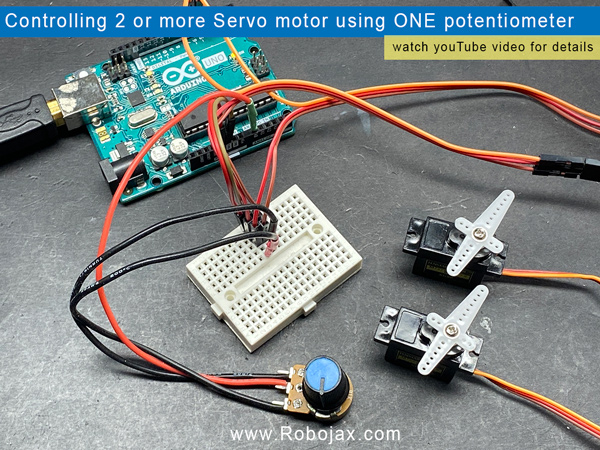
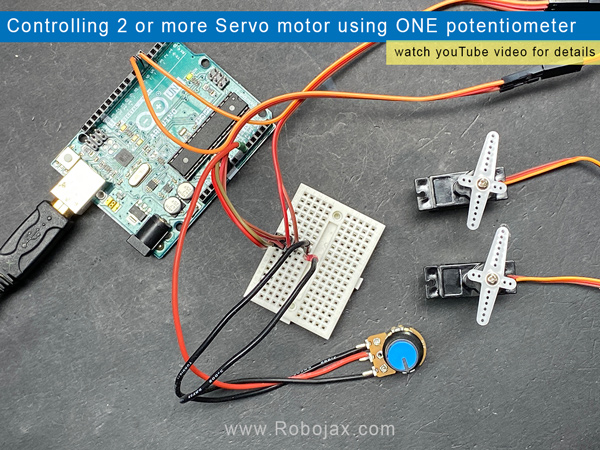
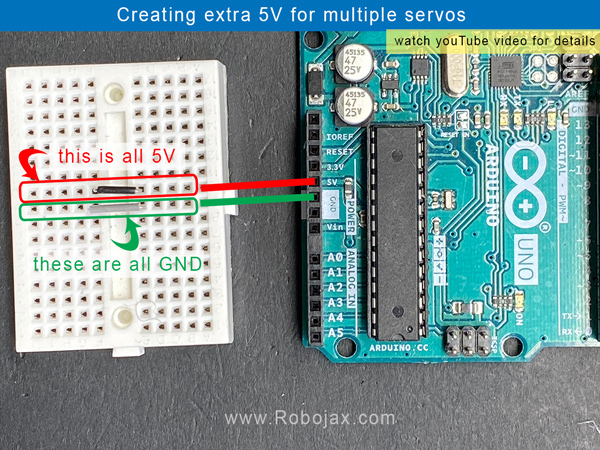
Learn how to control multiple servo motors using one potentiometer with Arduino. Wiring shown, code is explained and at the end demonstrated. Code link is below the timing of chapters of video.
 /*
 * Original code from File->Examples->Servo->Knob
 *
 * This is Arduino code to use ONE potentiometer (variable resistor) to control multiple servo motors
 * Please watch video instruction https://youtu.be/QB49Rmc96Ho
 * Updated from original code by
 * Ahmad Shamshiri on Oct 27, 2020 at 23:01 in Ajax
 * Ontario, Canada
 * www.robojax.com
 *
 Controlling a servo position using a potentiometer (variable resistor)
 by Michal Rinott <http://people.interaction-ivrea.it/m.rinott>

 modified on 8 Nov 2013
 by Scott Fitzgerald
 http://www.arduino.cc/en/Tutorial/Knob

 * Get this code and other Arduino codes from Robojax.com
Learn Arduino step by step in structured course with all material, wiring diagram and library
all in once place. Purchase My course on Udemy.com http://robojax.com/L/?id=62

If you found this tutorial helpful, please support me so I can continue creating
content like this. You can support me on Patreon http://robojax.com/L/?id=63

or make donation using PayPal http://robojax.com/L/?id=64

 *  * This code is "AS IS" without warranty or liability. Free to be used as long as you keep this note intact.*
 * This code has been download from Robojax.com
    This program is free software: you can redistribute it and/or modify
    it under the terms of the GNU General Public License as published by
    the Free Software Foundation, either version 3 of the License, or
    (at your option) any later version.

    This program is distributed in the hope that it will be useful,
    but WITHOUT ANY WARRANTY; without even the implied warranty of
    MERCHANTABILITY or FITNESS FOR A PARTICULAR PURPOSE.  See the
    GNU General Public License for more details.

    You should have received a copy of the GNU General Public License
    along with this program.  If not, see <https://www.gnu.org/licenses/>.
 */

#include <Servo.h>

Servo myservo1;  // create servo 1 object to control a servo
Servo myservo2;  // create servo 2 object to control a servo
//Servo myservo3 //create servo 3 object

int potpin = A0;  // analog pin used to connect the potentiometer
unsigned int servoPin[]={5,6};//watch video for details https://youtu.be/QB49Rmc96Ho
int val;    // variable to read the value from the analog pin

void setup() {
  Serial.begin(9600);
  Serial.println("Multiple Servo");
  Serial.println("Robojax.com");
  myservo1.attach(servoPin[0]);  // attaches the servo 1  to the servo object
  myservo2.attach(servoPin[1]);  // attaches the servo 2  to the servo object
  //add line for more servos  watch video for details https://youtu.be/QB49Rmc96Ho
}

void loop() {
  //watch video for details https://youtu.be/QB49Rmc96Ho
  val = analogRead(potpin);            // reads the value of the potentiometer (value between 0 and 1023)
  val = map(val, 0, 1023, 0, 180);     // scale it to use it with the servo (value between 0 and 180)
  myservo1.write(val);
  myservo2.write(val);

  Serial.print(val);
  Serial.println();
  // sets the servo position according to the scaled value
  delay(20);   // waits for the servo to get there
  //robojax.com code //watch video for details https://youtu.be/QB49Rmc96Ho
}

If you found this tutorial helpful, please support me so I can continue creating content like this. support me via PayPal 